Color Bar
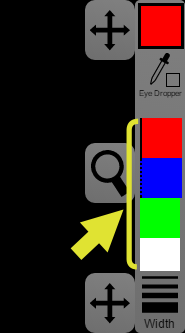
On the right of the screen is the color bar. The color bar is used for changing the current color and width.
At the top of the color bar is a square color swatch showing the current color. Choosing that color swatch will open a color picker window where you can choose an exact by color by specifying the hue, saturation, and brightness of the color you want.
 |
Just below the main color swatch with he current color is the eye dropper button. If you choose the eye dropper button, you can then choose a point from the drawing area, and the current color will be set to the color at the point you selected.
 |
In the middle of the color bar are many color swatches. These color swatches show the the most recently used colors. The color swatch at the top is the current color. Whenever you choose a new current color, this new color is inserted at the top of the swatches, and all the other swatches are moved down. You can quickly choose colors from these swatches of recently used colors to switch the current color.
 |
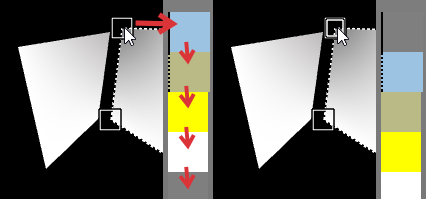
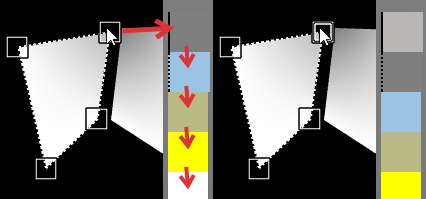
There are black lines on the left edge of the top two swatches of the most recently used colors. A solid black line on the left edge of a color swatch indicates that it is the most recent color. A dotted black line on the left edge of a color swatch indicates that it is the second most recent color. Usually, the top color swatch will have a solid black line and the color swatch below it will have a dotted black line. If the two most recent colors are the same, then only the top color will have a solid black line on its left edge, and the color below it will no line on its left edge. These indicators are useful when trying to set two different points to the same color.
At the bottom of the color is a button for setting the current width of lines. Choosing the button will open a Width window where you can choose from different line widths or directly enter a line width.
 |
Setting points to the same color
The indicators on the left edge of the most recent colors are useful for setting two points to the same color. When using the Edit Points tool, if you select a point, the point's color will become the current color. A swatch with that color will appear at the top of the list of most recently used colors and it will have a solid black bar on its left edge.
 |
If you select a different point, then that point's color will become the current color.
 |
If the two points already have the same color, then the list of most recent colors will not change. The top-most color will have a black line on its left edge because it is the most recent color. The second color will NOT have a line on its left edge.
 |
If the colors of the points are different, then the top color will be the color of the most recent point and will have a solid black line on its left edge. The second color will be the color of the previous point, and its left edge will have a dotted black line along its left edge. If you choose this second color, then the color of the most recent point will be set to the same color as the previous point. The two points will then have the same color.
 |
Setting welded points to the same color
There is an easier way to set points that are welded together to the same color. Just select the welded point using the Edit Points tool. Then, hold down the shift key when assigning a color to that point. All the points that are welded to that point will be given that color. When in touch mode, there is a Multi button near the lower-left of the screen that can be held down instead of the shift button.
 |
Contents